This article explains the changes in the page allocation mechanism in Sql Server 2016 with extensive list of examples
Introduction to Page and Extent in Sql Server
In Sql Server database object (i.e. Table/Index) data is stored on an 8KB data pages and a set of 8KB contiguous data pages form an extent of 64KB. In Sql Server memory management happens at extent level. There are two types of extents in Sql Server:
- Uniform Extent: An extent whose all 8 pages are reserved or filled with one Table data is referred as uniform extent
- Mixed Extent: An extent whose 8 pages are shared by multiple objects is referred as a mixed extent. At max a mixed extent can have pages belonging to 8 different tables
[ALSO READ] Live Query Statistics in Sql Server 2016
Page allocation mechanism in the versions of Sql Server prior to Sql Server 2016
Prior to Sql Server 2016 by default first 8 pages for the tables were from a mixed extent and subsequent pages were from an uniform extent. Microsoft in the versions of Sql Server prior to 2016 provided an option to override this behavior by means of Trace Flag 1118. If this trace flag is enabled, the first 8 data pages for the tables were also from Uniform Extent instead of Mixed Extent. This flag was helpful to avoid the resource contention issues, especially in the TempDB in the scenario’s where huge number of temp tables were created.
[ALSO READ] STRING_SPLIT function in Sql Server 2016
Page allocation mechanism in Sql Server 2016
Below is the page allocation mechanism in the TempDb and User Databases of Sql Server 2016
- TempDB Database
With Sql Server 2016, TempDb database objects by default will get the pages from the Uniform Extent.And there is no option to over-ride this behaviour. There is no effect of the Trace Flag 1118 on the page allocation behavior.
- User Databases
With Sql Server 2016, even the user databases objects by default will get the pages from the Uniform Extent. We can change this behavior by setting the database property MIXED_PAGE_ALLOCATION by using the ALTER DATABASE statement.
[ALSO READ] GZIP COMPRESS and DECOMPRESS functions in Sql Server 2016
Sys.Databases catalog view changes
In Sql Server 2016, the Sys.Databases catalog view has an additional column is_mixed_page_allocation_on. This column value 1 means the database table will get the first 8 pages from the mixed extent and subsequent pages from the uniform extent. And a value 0 means all the pages for the table are from the uniform extent.
Execute the following query to check the page allocation mechanism for the user and system databases
SELECT name, is_mixed_page_allocation_on
FROM Sys.Databases
RESULT:

From the result we can see that for the TempDB and user databases the mixed page allocation is OFF. It means TempDB and user databases in Sql Server 2016 by default will have the page allocated from uniform extent.
[ALSO READ] Dynamic Data Masking in Sql Server 2016
EXAMPLES
Let us understand these page allocation changes with below examples
EXAMPLE 1: This example compares the page allocation mechanism in user database between Sql Server 2016 and the previous versions of the Sql Server.
Page allocation mechanism in Sql Server 2016 user databases
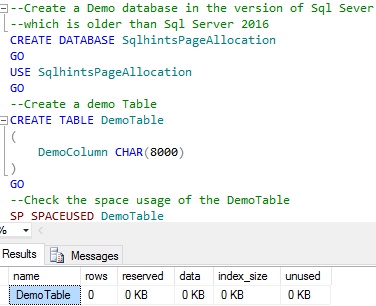
Create a demo database SqlhintsPageAllocation with a DemoTable table by executing the following script in Sql Server 2016:
--Create a Demo database
CREATE DATABASE SqlhintsPageAllocation
GO
USE SqlhintsPageAllocation
GO
--Create a demo Table
CREATE TABLE DemoTable
(
	DemoColumn CHAR(8000)
)
GO
--Check the space usage of the DemoTable
SP_SPACEUSED DemoTable
RESULT:
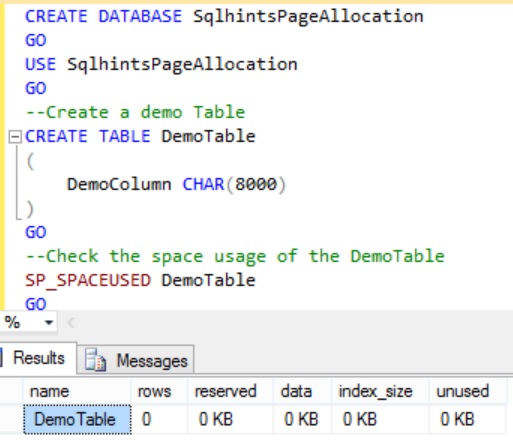
In one 8KB data page for data 8060 bytes is reserved. In the DemoTable, the DemoColumn is of type CHAR(8000) it means even when we store just one character in this column it will take 8000 bytes which is almost equivalent to 1 data page. So, we can consider 1 row in the DemoTable require 1 data page. From the above result we can see that when table is created initially no space is reserved for it.
Execute the following statement to insert 9 rows in to the DemoTable and display the space used after inserting each record:
INSERT INTO DemoTable VALUES ('A')
EXECUTE SP_SPACEUSED DemoTable
GO 9
RESULT:
[ALSO READ] GO Statement can also be used to excute batch of T-Sql statement multiple times
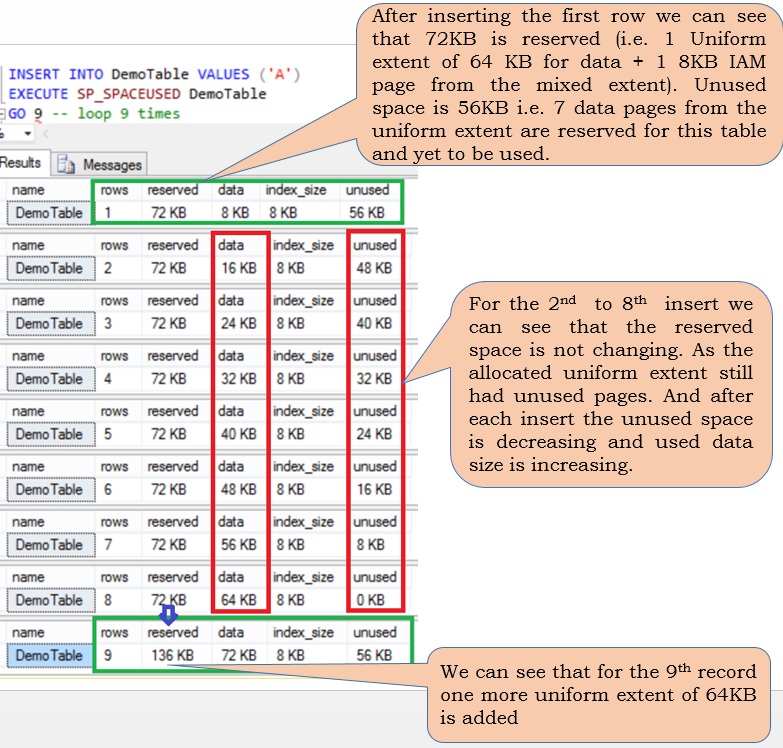
From the result we can see that insertion of the first record resulted in reserving 72KB space (i.e. 1 Uniform 64 KB extent + 1 8KB Index Allocation MAP(IAM) Page from the mixed extent). Each table will have at the least one IAM page, IAM page tracks all the pages and extents associated with a table. A table will have separate IAM page and it’s IAM page chain for the In-Row data, row overflow data and lob data. IAM pages will always be from the mixed extents.
Insertion of the 9th record resulted in the allocation of one more uniform extent, because that after the 9th record insertion we can see that reserved space is 136 KB( 72 KB + one more 64 KB uniform extent).
Execute the following un-document statement to get the all the pages associated with the DemoTable. Please don’t experiment any of such un-documented statements in the production environment.
DBCC IND ('SqlhintsPageAllocation','DemoTable',-1)
RESULT:
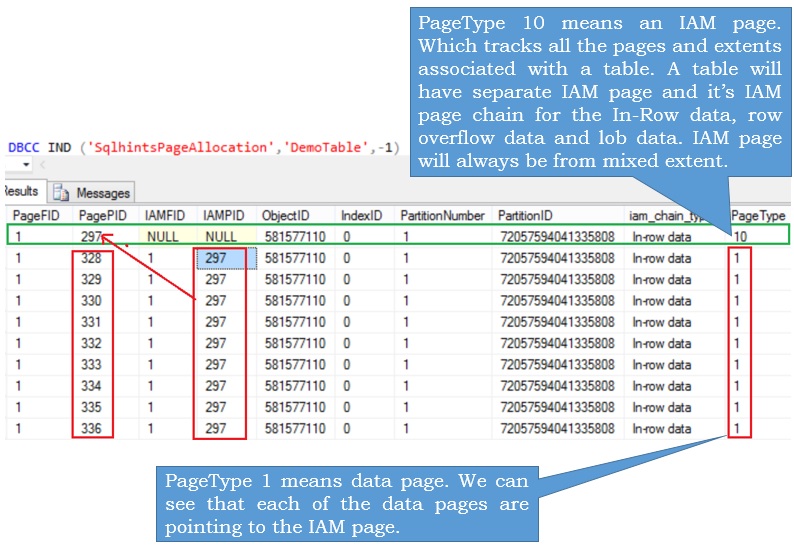
From the result we can see that DemoTable has 10 pages (1 IAM Page from mixed extent + 9 Data pages from the Uniform extents).
Page allocation mechanism in the older versions of Sql Server user databases
Execute the following statement to Create a demo database SqlhintsPageAllocation with a DemoTable table by executing the following script in the versions of the Sql Server older than Sql Server 2016. I am executing it on Sql Server 2012 instance.
--Create a Demo database in the version of Sql Sever
--which is older than Sql Server 2016
CREATE DATABASE SqlhintsPageAllocation
GO
USE SqlhintsPageAllocation
GO
--Create a demo Table
CREATE TABLE DemoTable
(
	DemoColumn CHAR(8000)
)
GO
--Check the space usage of the DemoTable
SP_SPACEUSED DemoTable
RESULT:
Execute the following statement to insert 9 rows in to the DemoTable and display the space used after inserting each record:
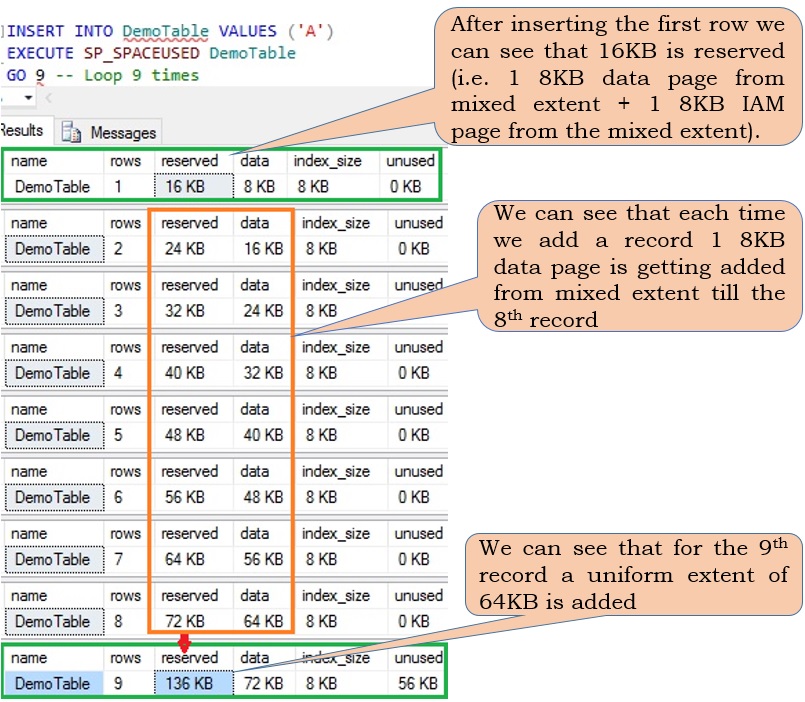
From the result we can see that insertion of the first record resulted in reserving 16KB space (i.e. 1 8KB data page from mixed extent + 1 8KB Index Allocation MAP(IAM) Page from the mixed extent). For each record insertion till the 8th record one 8KB data page is allocated from the mixed extent.
Insertion of the 9th record resulted in the allocation of one more uniform extent, after the 9th record insertion we can see that reserved space is 136 KB( 72 KB (previously alloated space) + one more 64 KB uniform extent).
Execute the following un-document statement to get the all the pages associated with the DemoTable. Please don’t experiment any of such un-documented statements in the production environment.
DBCC IND ('SqlhintsPageAllocation','DemoTable',-1)
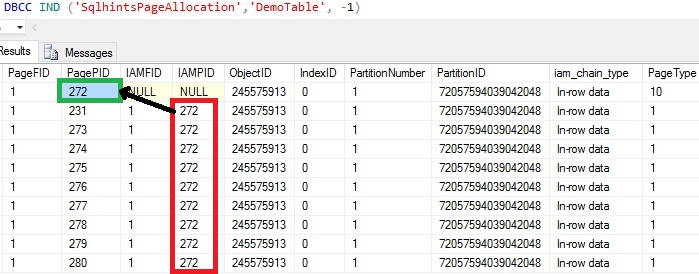
From the result we can see that DemoTable has 10 pages, one 8KB IAM Page from mixed extent and 9 Data pages (8 Pages from mixed extent and 1 page from uniform extent).
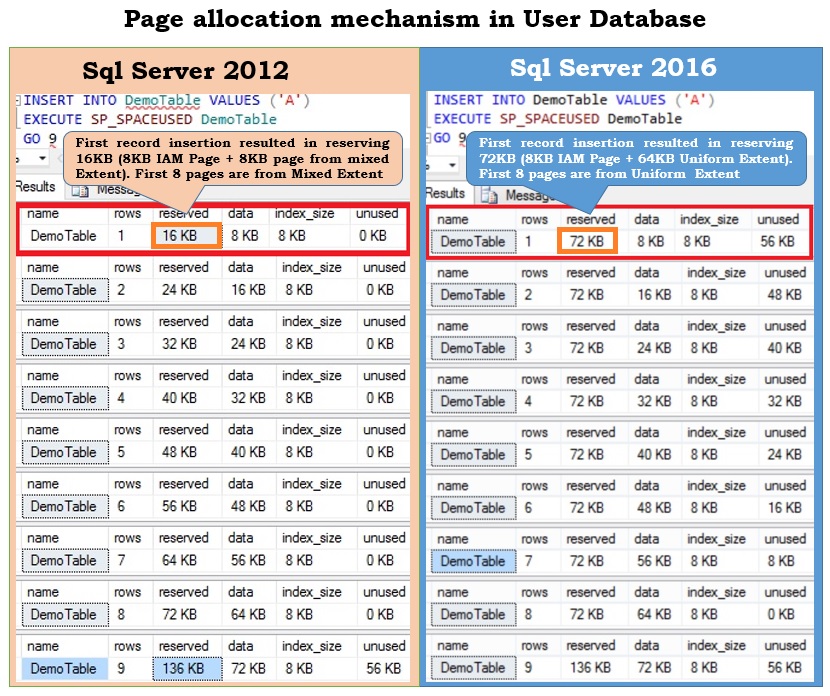
Summary: For user databases in the versions of Sql Server older than 2016, the first 8 data pages were allocated from the mixed extent and next pages from uniform extent. In Sql Server 2016 even the first eight data pages were allocated from the uniform extent. Below image summaries this page allocation mechanism comparison between Sql Server 2016 and older versions of Sql Server
[ALSO READ] Row level security in Sql Server 2016
EXAMPLE 2: This example compares the page allocation mechanism in the TempDB database between Sql Server 2016 and the previous versions of the Sql Server.
Page allocation mechanism in Sql Server 2016 TempDB database
Create a temporary table #DemoTable table by executing the following script in Sql Server 2016:
USE TEMPDB
GO
--Create a demo Temp Table
CREATE TABLE #DemoTable
(
	DemoColumn CHAR(8000)
)
GO
--Check the space usage of the temp table: #DemoTable
SP_SPACEUSED #DemoTable
GO
RESULT:
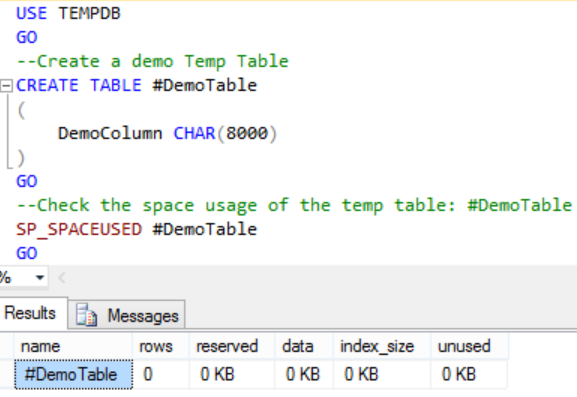
In one 8KB data page for data 8060 bytes is reserved. In the #DemoTable, the DemoColumn is of type CHAR(8000) it means even when we store just one character in this column it will take 8000 bytes which is almost equivalent to 1 data page. So, we can consider 1 row in the #DemoTable require 1 data page. From the above result we can see that when table is created initially no space is reserved for it.
Execute the following statement to insert 8 rows in to the #DemoTable temp table and display the space used after inserting each record:
INSERT INTO #DemoTable VALUES ('A')
EXECUTE SP_SPACEUSED #DemoTable
GO 8 -- loop 8 times
RESULT:
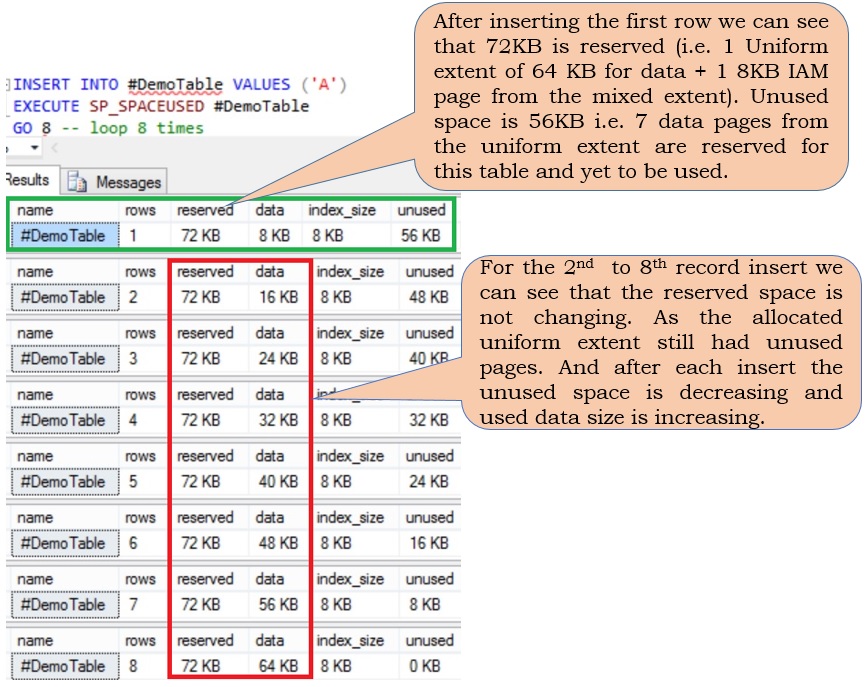
From the result we can see that insertion of the first record resulted in reserving 72KB space (i.e. 1 Uniform 64 KB extent + 1 8KB Index Allocation MAP(IAM) Page from the mixed extent). Each table will have at the least one IAM page, IAM page tracks all the pages and extents associated with a table. A table will have separate IAM page and it’s IAM page chain for the In-Row data, row overflow data and lob data. IAM pages will always be from the mixed extents.
Page allocation mechanism in the older versions of Sql Server TempDB
Create a temporary table #DemoTable table by executing the following script in the versions of the Sql Server older than Sql Server 2016. I am executing it on Sql Server 2012 instance.
USE TEMPDB
GO
--Create a demo Temp Table
CREATE TABLE #DemoTable
(
	DemoColumn CHAR(8000)
)
GO
--Check the space usage of the temp table: #DemoTable
SP_SPACEUSED #DemoTable
GO
RESULT:

Execute the following statement to insert 8 rows in to the temp table #DemoTable and display the space used after inserting each record:
INSERT INTO #DemoTable VALUES ('A')
EXECUTE SP_SPACEUSED #DemoTable
GO 8 -- loop 8 times
RESULT:
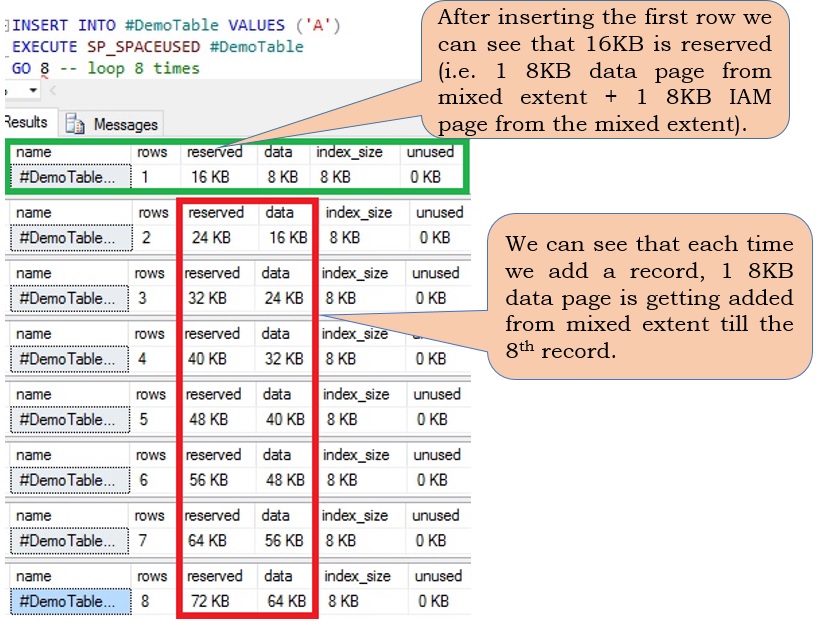
From the result we can see that insertion of the first record resulted in reserving 16KB space (i.e. 1 8KB data page from mixed extent + 1 8KB Index Allocation MAP(IAM) Page from the mixed extent). For each record insertion till the 8th record one 8KB data page is allocated from the mixed extent.
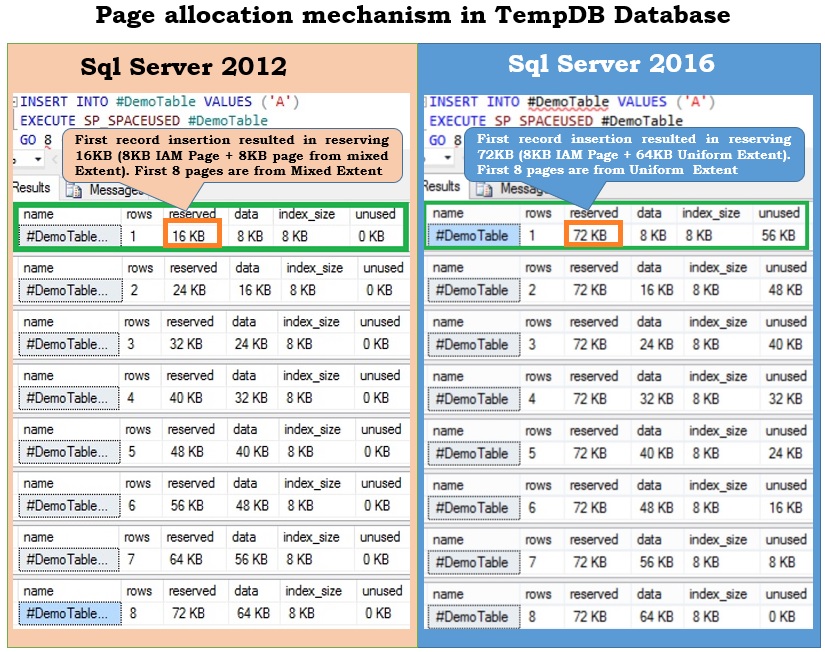
Summary: In the versions of Sql Server older than 2016 for TempDB, by default the first 8 data pages were allocated from the mixed extent and next pages were from uniform extent. In Sql Server 2016 even the first eight data pages were allocated from the uniform extent. Below image summaries this page allocation mechanism comparison between Sql Server 2016 and older versions of Sql Server

[ALSO READ] DROP IF EXISTS Statement in Sql Server 2016
Changing Page allocation mechanism at database level
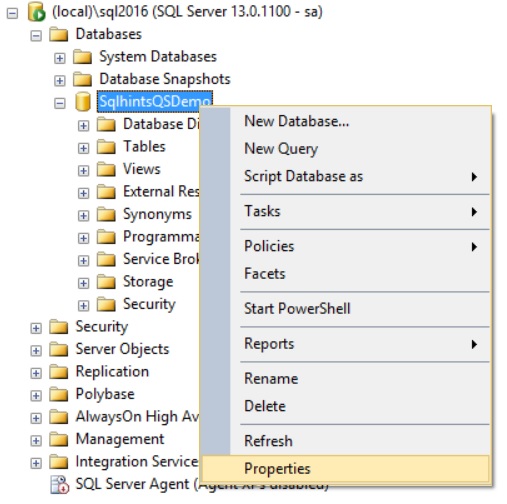
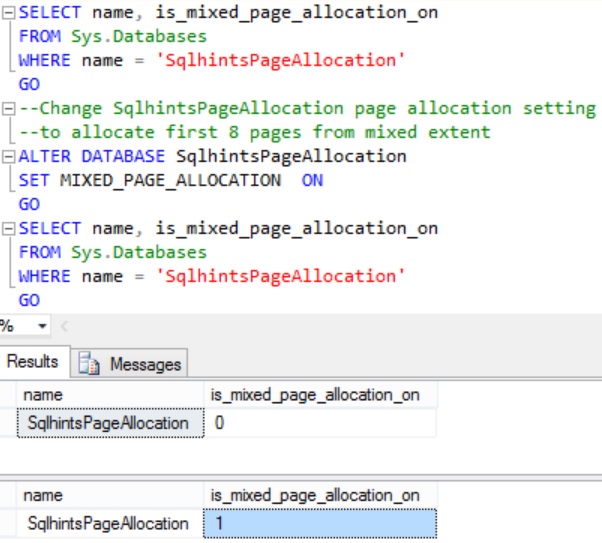
By default in Sql Server 2016 both TempDB and User Database objects will get all the pages are allocated from the uniform extent. Sql Server 2016 provides a mechanism where we can change this behavior in the user database by the ALTER DATABASE statement. We an execute a script like the below one which is changing the SqlhintsPageAllocation database default seeting to alloate first 8 pages for the data base objects from uniform extent to mixed extent
SELECT name, is_mixed_page_allocation_on
FROM Sys.Databases
WHERE name = 'SqlhintsPageAllocation'
GO
--Change SqlhintsPageAllocation page alloation setting
--to allocate first 8 pages from mixed extent
ALTER DATABASE SqlhintsPageAllocation
SET MIXED_PAGE_ALLOCATION  ON
GO
SELECT name, is_mixed_page_allocation_on
FROM Sys.Databases
WHERE name = 'SqlhintsPageAllocation'
GO
RESULT:
Let us execute the following statement to change TempDB database page allocation mechanism
ALTER DATABASE TempDB
SET MIXED_PAGE_ALLOCATION  ON
RESULT:
Msg 5058, Level 16, State 9, Line 1
Option ‘MIXED_PAGE_ALLOCATION’ cannot be set in database ‘tempdb’.
From the result we can see that TempDB database default page allocation mechanism can’t be changed. Where as user databases page allocation mechanism can be changed
[ALSO READ]:
| New features in SQL SERVER 2016 |
|
|