Tag Archives: Sql 2016

Page allocation changes in Sql Server 2016

This article explains the changes in the page allocation mechanism in Sql Server 2016 with extensive list of examples

Comparision of Page allocation in TempDB

Introduction to Page and Extent in Sql Server

In Sql Server database object (i.e. Table/Index) data is stored on an 8KB data pages and a set of 8KB contiguous data pages form an extent of 64KB. In Sql Server memory management happens at extent level. There are two types of extents in Sql Server:

  • Uniform Extent: An extent whose all 8 pages are reserved or filled with one Table data is referred as uniform extent
  • Mixed Extent: An extent whose 8 pages are shared by multiple objects is referred as a mixed extent. At max a mixed extent can have pages belonging to 8 different tables

[ALSO READ] Live Query Statistics in Sql Server 2016

Page allocation mechanism in the versions of Sql Server prior to Sql Server 2016

Prior to Sql Server 2016 by default first 8 pages for the tables were from a mixed extent and subsequent pages were from an uniform extent. Microsoft in the versions of Sql Server prior to 2016 provided an option to override this behavior by means of Trace Flag 1118. If this trace flag is enabled, the first 8 data pages for the tables were also from Uniform Extent instead of Mixed Extent. This flag was helpful to avoid the resource contention issues, especially in the TempDB in the scenario’s where huge number of temp tables were created.

[ALSO READ] STRING_SPLIT function in Sql Server 2016

Page allocation mechanism in Sql Server 2016

Below is the page allocation mechanism in the TempDb and User Databases of Sql Server 2016

  • TempDB Database
    With Sql Server 2016, TempDb database objects by default will get the pages from the Uniform Extent.And there is no option to over-ride this behaviour. There is no effect of the Trace Flag 1118 on the page allocation behavior.
  • User Databases
    With Sql Server 2016, even the user databases objects by default will get the pages from the Uniform Extent. We can change this behavior by setting the database property MIXED_PAGE_ALLOCATION by using the ALTER DATABASE statement.

[ALSO READ] GZIP COMPRESS and DECOMPRESS functions in Sql Server 2016

Sys.Databases catalog view changes

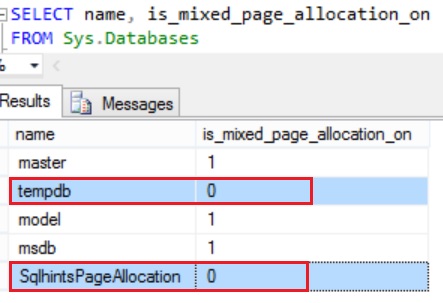
In Sql Server 2016, the Sys.Databases catalog view has an additional column is_mixed_page_allocation_on. This column value 1 means the database table will get the first 8 pages from the mixed extent and subsequent pages from the uniform extent. And a value 0 means all the pages for the table are from the uniform extent.

Execute the following query to check the page allocation mechanism for the user and system databases

SELECT name, is_mixed_page_allocation_on 
FROM Sys.Databases

RESULT:
Default Page Allocation Setting for TempDB and User Database

From the result we can see that for the TempDB and user databases the mixed page allocation is OFF. It means TempDB and user databases in Sql Server 2016 by default will have the page allocated from uniform extent.

[ALSO READ] Dynamic Data Masking in Sql Server 2016

EXAMPLES

Let us understand these page allocation changes with below examples

EXAMPLE 1: This example compares the page allocation mechanism in user database between Sql Server 2016 and the previous versions of the Sql Server.

Page allocation mechanism in Sql Server 2016 user databases

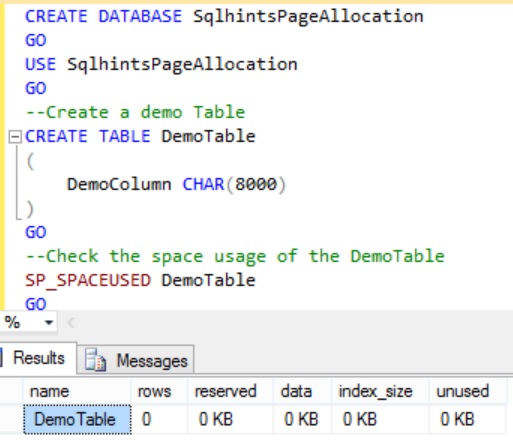
Create a demo database SqlhintsPageAllocation with a DemoTable table by executing the following script in Sql Server 2016:

--Create a Demo database
CREATE DATABASE SqlhintsPageAllocation 
GO
USE SqlhintsPageAllocation
GO
--Create a demo Table
CREATE TABLE DemoTable
(
	DemoColumn CHAR(8000)
)
GO
--Check the space usage of the DemoTable
SP_SPACEUSED DemoTable

RESULT:
Initial Space Usage

In one 8KB data page for data 8060 bytes is reserved. In the DemoTable, the DemoColumn is of type CHAR(8000) it means even when we store just one character in this column it will take 8000 bytes which is almost equivalent to 1 data page. So, we can consider 1 row in the DemoTable require 1 data page. From the above result we can see that when table is created initially no space is reserved for it.

Execute the following statement to insert 9 rows in to the DemoTable and display the space used after inserting each record:

INSERT INTO DemoTable VALUES ('A')
EXECUTE SP_SPACEUSED DemoTable
GO 9 

RESULT:
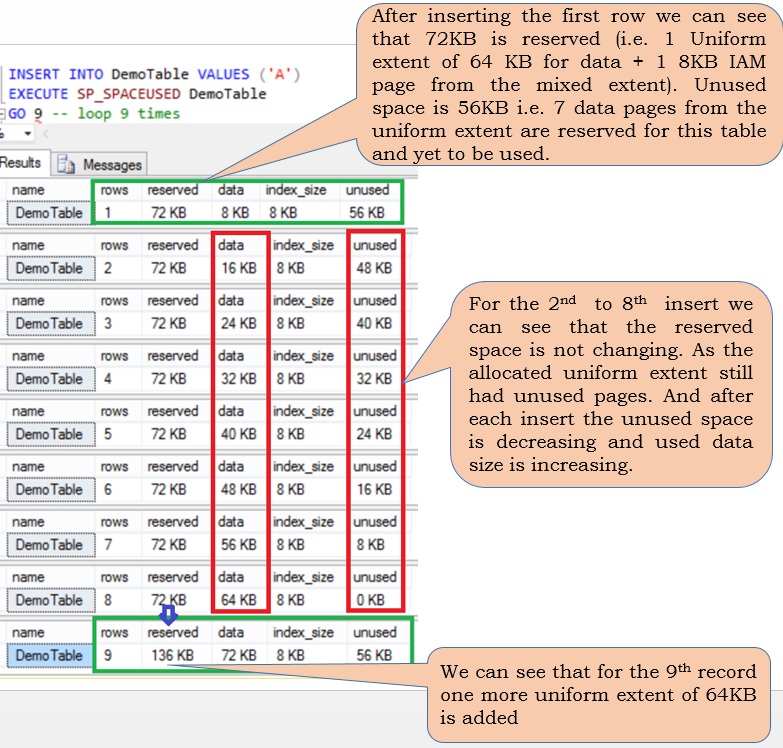
User Database Uniform Extent Allocation
[ALSO READ] GO Statement can also be used to excute batch of T-Sql statement multiple times

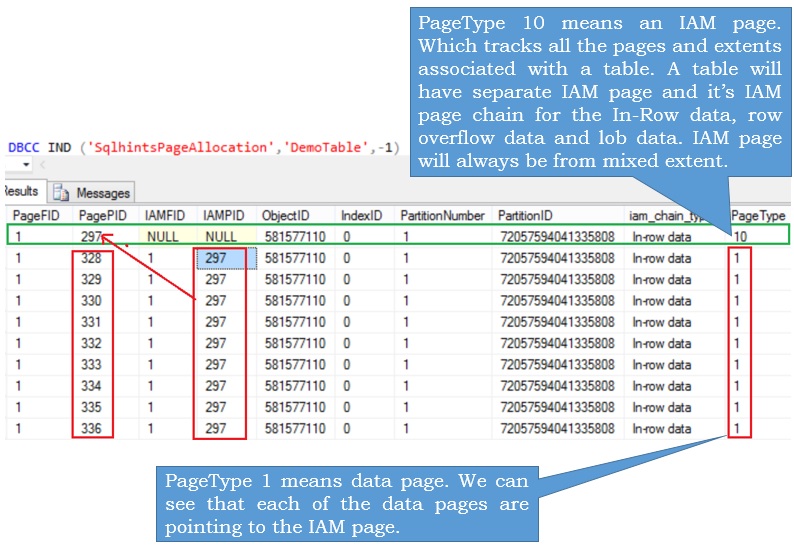
From the result we can see that insertion of the first record resulted in reserving 72KB space (i.e. 1 Uniform 64 KB extent + 1 8KB Index Allocation MAP(IAM) Page from the mixed extent). Each table will have at the least one IAM page, IAM page tracks all the pages and extents associated with a table. A table will have separate IAM page and it’s IAM page chain for the In-Row data, row overflow data and lob data. IAM pages will always be from the mixed extents.

Insertion of the 9th record resulted in the allocation of one more uniform extent, because that after the 9th record insertion we can see that reserved space is 136 KB( 72 KB + one more 64 KB uniform extent).

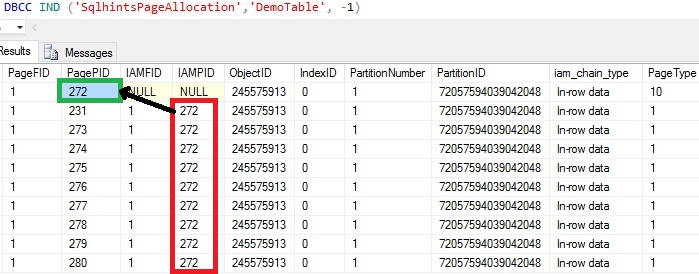
Execute the following un-document statement to get the all the pages associated with the DemoTable. Please don’t experiment any of such un-documented statements in the production environment.

 
DBCC IND ('SqlhintsPageAllocation','DemoTable',-1)

RESULT:
Pages of the DemoTable

From the result we can see that DemoTable has 10 pages (1 IAM Page from mixed extent + 9 Data pages from the Uniform extents).

Page allocation mechanism in the older versions of Sql Server user databases

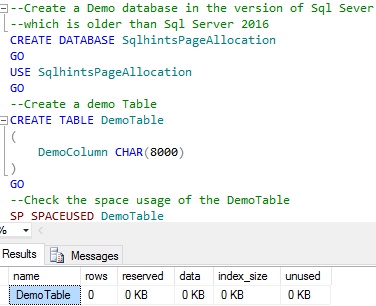
Execute the following statement to Create a demo database SqlhintsPageAllocation with a DemoTable table by executing the following script in the versions of the Sql Server older than Sql Server 2016. I am executing it on Sql Server 2012 instance.

--Create a Demo database in the version of Sql Sever
--which is older than Sql Server 2016
CREATE DATABASE SqlhintsPageAllocation 
GO
USE SqlhintsPageAllocation
GO
--Create a demo Table
CREATE TABLE DemoTable
(
	DemoColumn CHAR(8000)
)
GO
--Check the space usage of the DemoTable
SP_SPACEUSED DemoTable

RESULT:
Initial Space Usage in Older Sql Versions

Execute the following statement to insert 9 rows in to the DemoTable and display the space used after inserting each record:

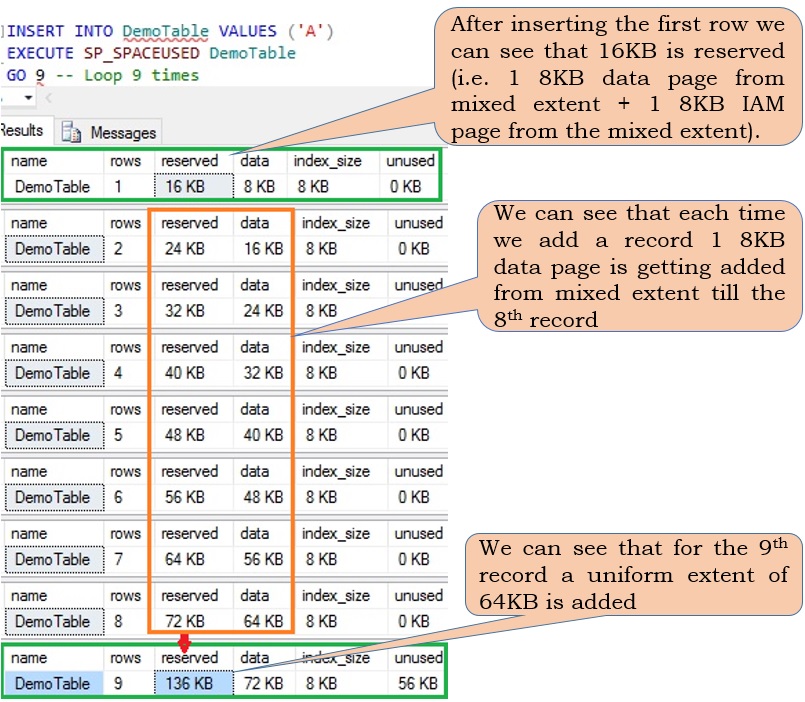
User Database Mixed Extent Allocation Sql Server 2012

From the result we can see that insertion of the first record resulted in reserving 16KB space (i.e. 1 8KB data page from mixed extent + 1 8KB Index Allocation MAP(IAM) Page from the mixed extent). For each record insertion till the 8th record one 8KB data page is allocated from the mixed extent.

Insertion of the 9th record resulted in the allocation of one more uniform extent, after the 9th record insertion we can see that reserved space is 136 KB( 72 KB (previously alloated space) + one more 64 KB uniform extent).

Execute the following un-document statement to get the all the pages associated with the DemoTable. Please don’t experiment any of such un-documented statements in the production environment.

DBCC IND ('SqlhintsPageAllocation','DemoTable',-1)

Pages of the DemoTable in older versions

From the result we can see that DemoTable has 10 pages, one 8KB IAM Page from mixed extent and 9 Data pages (8 Pages from mixed extent and 1 page from uniform extent).

Summary: For user databases in the versions of Sql Server older than 2016, the first 8 data pages were allocated from the mixed extent and next pages from uniform extent. In Sql Server 2016 even the first eight data pages were allocated from the uniform extent. Below image summaries this page allocation mechanism comparison between Sql Server 2016 and older versions of Sql Server
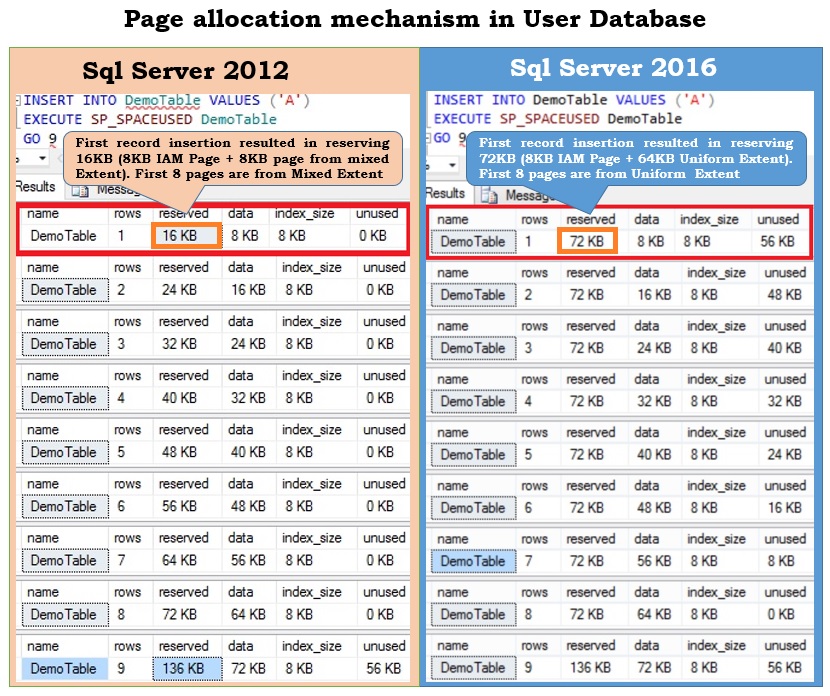
Comparision of Page allocation in User Database
[ALSO READ] Row level security in Sql Server 2016

EXAMPLE 2: This example compares the page allocation mechanism in the TempDB database between Sql Server 2016 and the previous versions of the Sql Server.

Page allocation mechanism in Sql Server 2016 TempDB database

Create a temporary table #DemoTable table by executing the following script in Sql Server 2016:

USE TEMPDB
GO
--Create a demo Temp Table
CREATE TABLE #DemoTable
(
	DemoColumn CHAR(8000)
)
GO
--Check the space usage of the temp table: #DemoTable
SP_SPACEUSED #DemoTable
GO

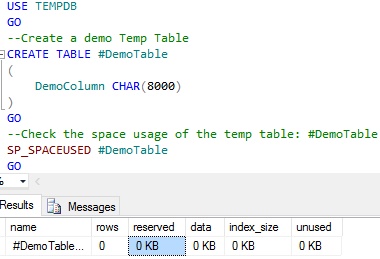
RESULT:
TempDB12016

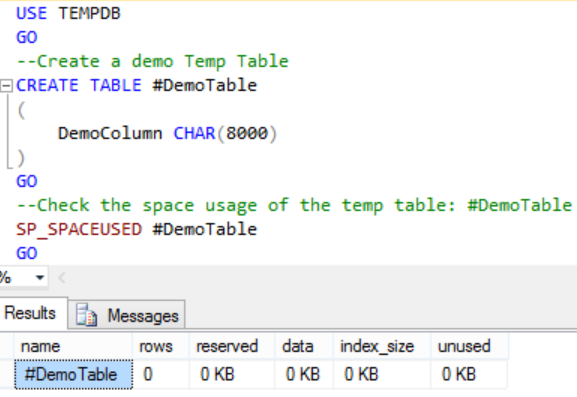
In one 8KB data page for data 8060 bytes is reserved. In the #DemoTable, the DemoColumn is of type CHAR(8000) it means even when we store just one character in this column it will take 8000 bytes which is almost equivalent to 1 data page. So, we can consider 1 row in the #DemoTable require 1 data page. From the above result we can see that when table is created initially no space is reserved for it.

Execute the following statement to insert 8 rows in to the #DemoTable temp table and display the space used after inserting each record:

INSERT INTO #DemoTable VALUES ('A')
EXECUTE SP_SPACEUSED #DemoTable
GO 8 -- loop 8 times

RESULT:
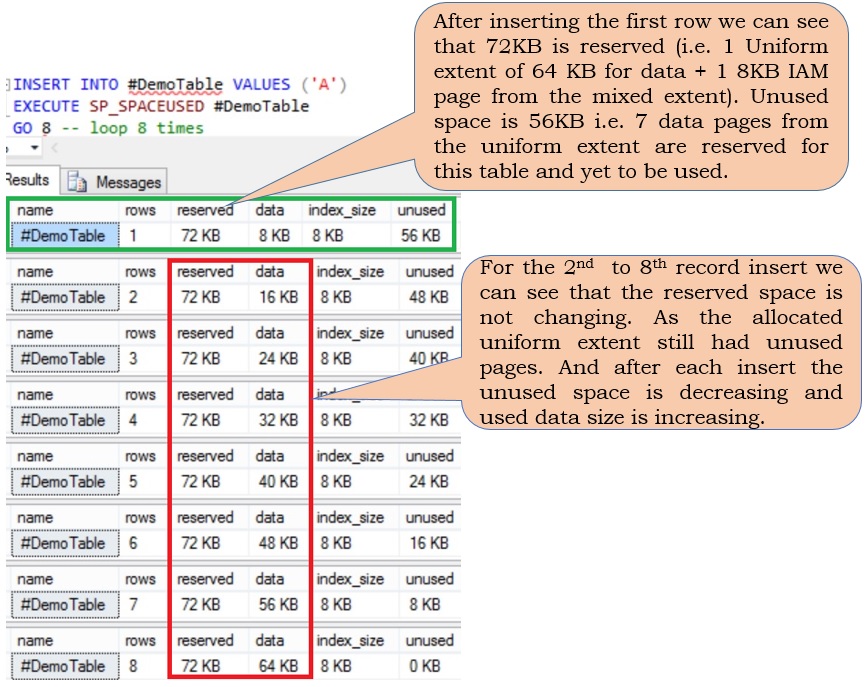
Uniform Extent Allocation for TempDB

From the result we can see that insertion of the first record resulted in reserving 72KB space (i.e. 1 Uniform 64 KB extent + 1 8KB Index Allocation MAP(IAM) Page from the mixed extent). Each table will have at the least one IAM page, IAM page tracks all the pages and extents associated with a table. A table will have separate IAM page and it’s IAM page chain for the In-Row data, row overflow data and lob data. IAM pages will always be from the mixed extents.

Page allocation mechanism in the older versions of Sql Server TempDB

Create a temporary table #DemoTable table by executing the following script in the versions of the Sql Server older than Sql Server 2016. I am executing it on Sql Server 2012 instance.

USE TEMPDB
GO
--Create a demo Temp Table
CREATE TABLE #DemoTable
(
	DemoColumn CHAR(8000)
)
GO
--Check the space usage of the temp table: #DemoTable
SP_SPACEUSED #DemoTable
GO

RESULT:
TempDB12012

Execute the following statement to insert 8 rows in to the temp table #DemoTable and display the space used after inserting each record:

INSERT INTO #DemoTable VALUES ('A')
EXECUTE SP_SPACEUSED #DemoTable
GO 8 -- loop 8 times

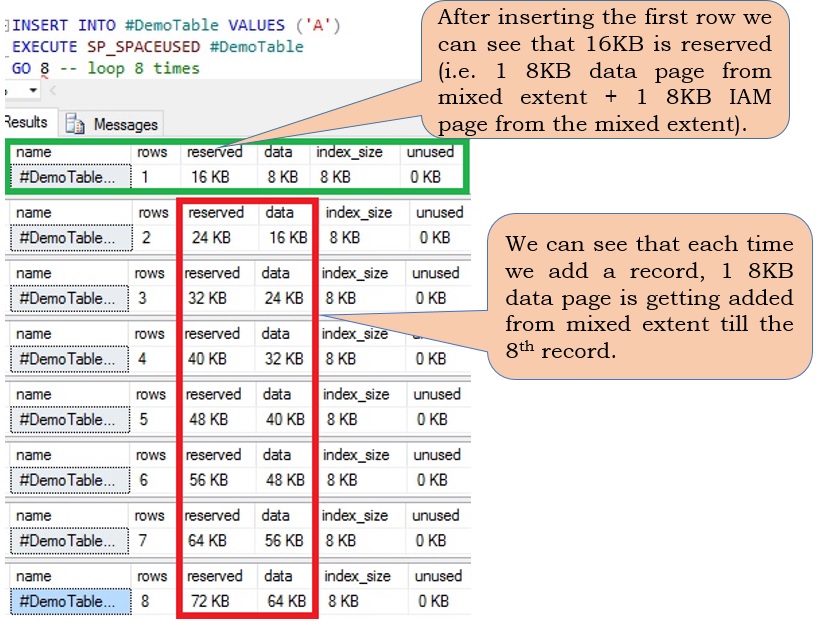
RESULT:
Mixed Extent Allocation for TempDB

From the result we can see that insertion of the first record resulted in reserving 16KB space (i.e. 1 8KB data page from mixed extent + 1 8KB Index Allocation MAP(IAM) Page from the mixed extent). For each record insertion till the 8th record one 8KB data page is allocated from the mixed extent.

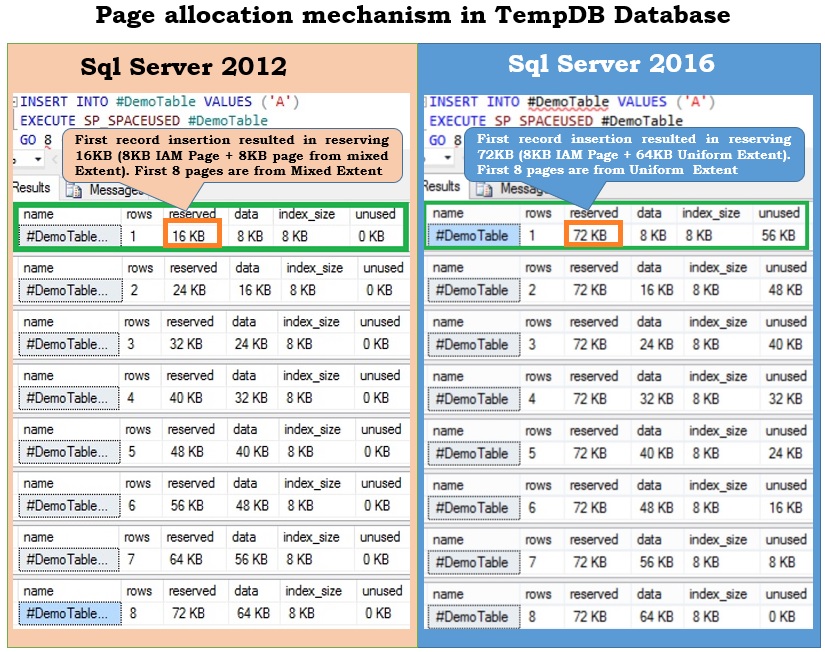
Summary: In the versions of Sql Server older than 2016 for TempDB, by default the first 8 data pages were allocated from the mixed extent and next pages were from uniform extent. In Sql Server 2016 even the first eight data pages were allocated from the uniform extent. Below image summaries this page allocation mechanism comparison between Sql Server 2016 and older versions of Sql Server
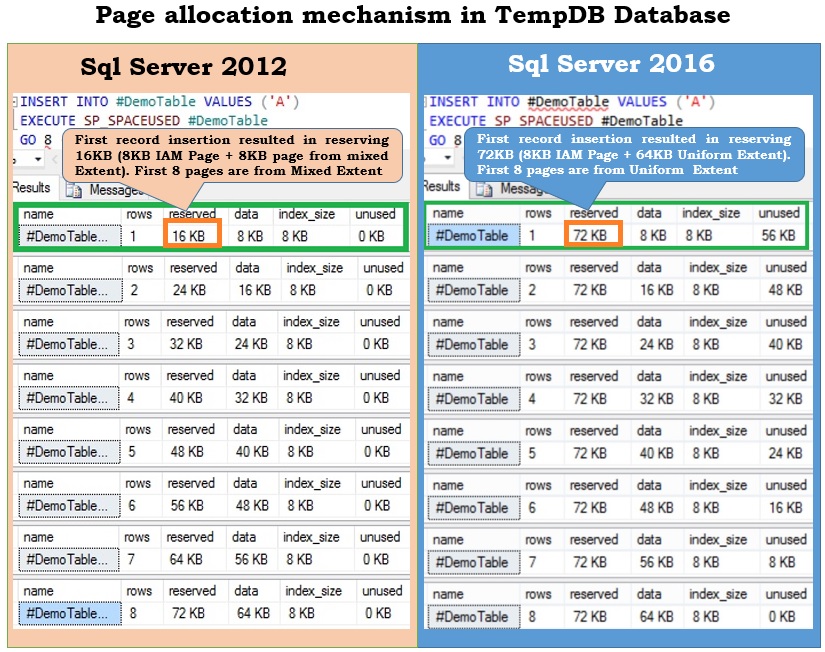
Comparision of Page allocation in TempDB
[ALSO READ] DROP IF EXISTS Statement in Sql Server 2016

Changing Page allocation mechanism at database level

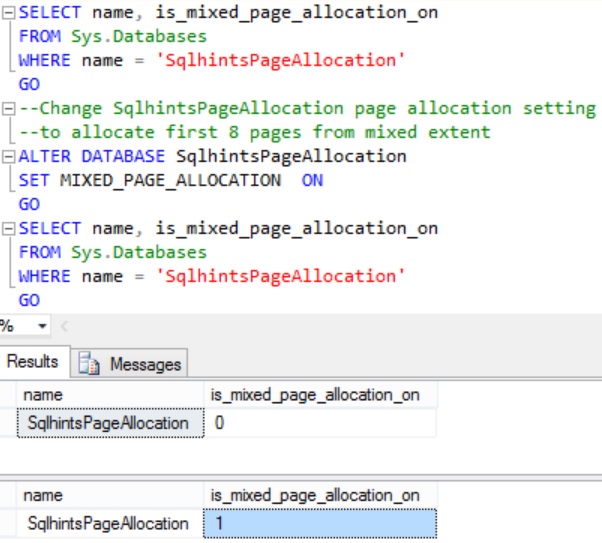
By default in Sql Server 2016 both TempDB and User Database objects will get all the pages are allocated from the uniform extent. Sql Server 2016 provides a mechanism where we can change this behavior in the user database by the ALTER DATABASE statement. We an execute a script like the below one which is changing the SqlhintsPageAllocation database default seeting to alloate first 8 pages for the data base objects from uniform extent to mixed extent

SELECT name, is_mixed_page_allocation_on 
FROM Sys.Databases
WHERE name = 'SqlhintsPageAllocation'
GO
--Change SqlhintsPageAllocation page alloation setting
--to allocate first 8 pages from mixed extent
ALTER DATABASE SqlhintsPageAllocation 
SET MIXED_PAGE_ALLOCATION  ON
GO
SELECT name, is_mixed_page_allocation_on 
FROM Sys.Databases
WHERE name = 'SqlhintsPageAllocation'
GO

RESULT:
Changing MIXED_PAGE_ALLOCATION Setting

Let us execute the following statement to change TempDB database page allocation mechanism

ALTER DATABASE TempDB
SET MIXED_PAGE_ALLOCATION  ON

RESULT:

Msg 5058, Level 16, State 9, Line 1
Option ‘MIXED_PAGE_ALLOCATION’ cannot be set in database ‘tempdb’.

From the result we can see that TempDB database default page allocation mechanism can’t be changed. Where as user databases page allocation mechanism can be changed

[ALSO READ]:
New features in SQL SERVER 2016

JSON_MODIFY Function in Sql Server 2016

JSON_MODIFY is one of the new JSON function introduced in Sql Server 2016. This function can be used to update the value of the property in a JSON string and returns the updated JSON string.

SYNTAX:

JSON_MODIFY (json_string, json_path , new_value)

WHERE
json_string : Is the JSON String which needs to be updated
json_path : Is the location of the property in the json_string, whose value needs to be updated
new_value : The new value for the property in the json_string

Let us understand this function with extensive list of examples.

EXAMPLE 1: Updating JSON Property Value

In this example the JSON_MODIFY function is used to update the FirstName property value from Basavaraj to Basav

SELECT
 JSON_MODIFY('{"FirstName":"Basavaraj","Last Name":"Biradar"}',
                   '$.FirstName','Basav') AS 'Updated JSON'

RESULT:
JSON_MODIFY Example 1

[ALSO READ] ISJSON Function in Sql Server 2016

EXAMPLE 2: Updating JSON property value where JSON_MODIFY function json_string and new_value are variables

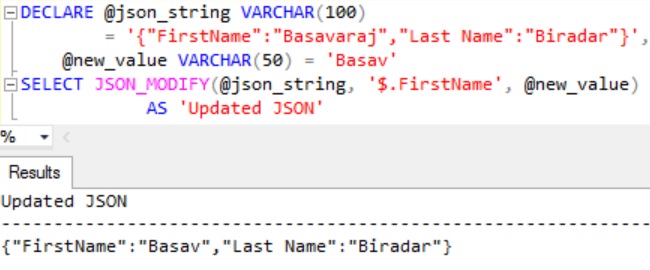
This example is same as Example 1, the only difference here is instead of passing JSON string as a constant assigning it to the variable @json_string and passing this variable to the function. And the new value is set to the variable @new_value and passed it to the function.

DECLARE @json_string VARCHAR(100) 
	= '{"FirstName":"Basavaraj","Last Name":"Biradar"}',
	@new_value VARCHAR(50) = 'Basav'
SELECT JSON_MODIFY(@json_string,'$.FirstName',
                     @new_value) AS 'Updated JSON'

RESULT:
JSON_MODIFY Example 2

In the above example we can see that only the json_path is a string literal. Let us assign this also to a variable and pass it to the JSON_MODIFY function.

DECLARE @json_string VARCHAR(100) 
		= '{"FirstName":"Basavaraj","Last Name":"Biradar"}',
	@json_path VARCHAR(50) = '$.FirstName',
@new_value VARCHAR(50) = 'Basav'
SELECT JSON_MODIFY(@json_string, @json_path, 
                     @new_value) AS 'Updated JSON'

RESULT:

Msg 13610, Level 16, State 2, Line 5
The argument 2 of the “JSON_MODIFY” must be a string literal.

From the result we can see that the JSON PATH expression should always be a string literal

[ALSO READ] JSON_VALUE Function in Sql Server 2016

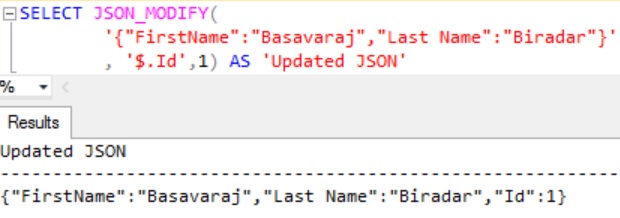
EXAMPLE 3: Adding Id property and it’s value to the JSON string

The below script adds the Id property to the JSON string

SELECT JSON_MODIFY(
   '{"FirstName":"Basavaraj","Last Name":"Biradar"}'
   , '$.Id', 1) AS 'Updated JSON'

RESULT:
JSON_MODIFY Insert Property Example 3

[ALSO READ] lax and strict JSON Path modes in Sql Server 2016

EXAMPLE 4: Impact of JSON Path mode on adding a new property to the existing JSON string

Execute the following statement which is same as the example 3 script, the only difference is in the json_path the JSON path mode strict is specified.

SELECT JSON_MODIFY(
      '{"FirstName":"Basavaraj","Last Name":"Biradar"}'
      , '$.Id', 1) AS 'Updated JSON'

RESULT:

Msg 13608, Level 16, State 2, Line 1
Property cannot be found on the specified JSON path.

From the result we can see that the strict path mode will not allow adding of a new property to the JSON string

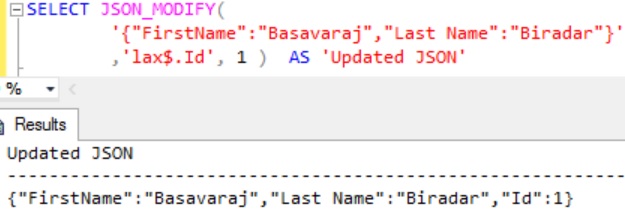
Execute the following statement which is same as the above example script, the only difference is in the JSON path mode. Here in this statement the JSON path mode is lax and it is the default path mode when it is not specified.

SELECT JSON_MODIFY(
        '{"FirstName":"Basavaraj","Last Name":"Biradar"}'
		,'lax$.Id', 1 )	 AS 'Updated JSON'

RESULT:
JSON_MODIFY Insert Property lax path mode Example 4

From the result we can see that lax JSON Path mode allows adding a new JSON property. The JSON Path mode lax is the default path mode and if path mode is not specified it will consider it as lax. We can see that in example 3 when path mode is not specified we are able to add the new property.

[ALSO READ] JSON_QUERY Function in Sql Server 2016

EXAMPLE 5: This example shows how setting a NULL value for the JSON property will remove that property from the JSON string

SELECT JSON_MODIFY(
        '{"Id":1,"FirstName":"Basavaraj","Last Name":"Biradar"}'
		,'$.Id', NULL)	 AS 'Updated JSON'

RESULT:
Removing an Existing Property Example 5

[ALSO READ] FOR JSON Clause in Sql Server 2016

Example 6: This example explains how we can set a NULL value for a JSON property

In the example 5 we saw that setting a NULL value for a JSON property resulted in that property getting deleted from the JSON string. But if we have requirement where we need to set the NULL value for a JSON property value then in the JSON path we have to specify strict JSON path mode as in the below script:

SELECT JSON_MODIFY(
        '{"Id":1,"FirstName":"Basavaraj","Last Name":"Biradar"}'
		,'strict$.Id', NULL)	 AS 'Updated JSON'

RESULT:
Setting NULL value for a JSON property Example 6

[ALSO READ] OPENJSON Function in Sql Server 2016

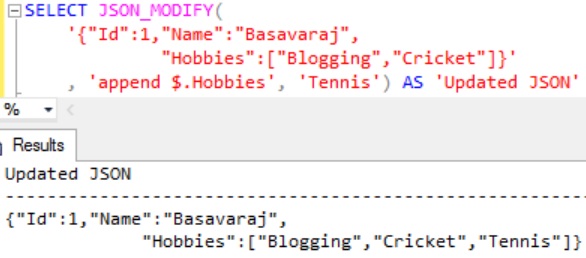
EXAMPLE 7: This example shows how we can append a value to the JSON Array.

Execute the below statement to add the hobby Tennis to the Hobbies array:

SELECT JSON_MODIFY(
            '{"Id":1,"Name":"Basavaraj",
            "Hobbies":["Blogging","Cricket"]}',
            'append $.Hobbies','Tennis') AS 'Updated JSON'

RESULT:
Adding value to the JSON Array Example 7

[ALSO READ] STRING_SPLIT function in Sql Server 2016

EXAMPLE 8: This example shows how we can add a JSON object to the JSON string.

Execute the following statement to add Address which is of type JSON object to the JSON string:

SELECT JSON_MODIFY(
	'{"Id":1,"Name":"Basavaraj"}'
	,'$.Address'
	,'{"State":"KA","Country":"India"}') AS 'Updated JSON'

RESULT:
Adding JSON Object to JSON string Example 8

From the result we can see that JSON_MODIFY function is escaping the double quote in the JSON object which is getting added. The reason for this is JSON_MODIFY function is treating the JSON object as a normal text instead of valid JSON.

But if you want to avoid the escaping the JSON object which is getting added, use the JSON_QUERY function as shown below:

SELECT JSON_MODIFY(
    '{"Id":1,"Name":"Basavaraj"}'
    ,'$.Address'
    ,JSON_QUERY('{"State":"KA","Country":"India"}')) 
           AS 'Updated JSON'

RESULT:
Adding JSON Object to JSON string Example 8 1

[ALSO READ] DATEDIFF_BIG Function in Sql Server 2016

EXAMPLE 9: This example shows how we can modify the property value of JSON string stored in the Table Column.

Create a Customer table as shown in the below image with sample data by the following script

Customer Table
Script:

CREATE DATABASE SqlHintsJSONModify
GO
USE SqlHintsJSONModify
GO
CREATE TABLE dbo.Customer( 
    Id INT IDENTITY(1,1) NOT NULL PRIMARY KEY,
    Name NVARCHAR(50), Detail NVARCHAR(MAX))
GO
INSERT INTO dbo.Customer ( Name, Detail )
VALUES 
  ('Basavaraj','{"Address":{"State":"KA","Country":"India"}}'),
  ('Kalpana','{"Address":{"State":"MH","Country":"India"}}')

Execute the following statement and observe that the customer Kalpana’s state property value in the Detail column is MH.

SELECT * FROM dbo.Customer WHERE Name = 'Kalpana'

RESULT:
DataBeforeUpdate

Execute the following statement to update the Customer Kalpana’s State to KA from MH.

UPDATE Customer
SET Detail = JSON_MODIFY(Detail , '$.Address.State','KA')
WHERE Name = 'Kalpana'

Now execute the following statement to check whether the customer Kalpana’s state value is updated to KA from MH.

SELECT * FROM dbo.Customer WHERE Name = 'Kalpana'

RESULT:
DataAfterUpdate

[ALSO READ]

New features in SQL SERVER 2016

Dynamic Data Masking in Sql Server 2016

Dynamic data masking is one of the new Security Feature introduced in Sql Server 2016. It provides a mechanism to obfuscate or mask the data from non-privileged users. And the users with sufficient permission will have complete access to the actual or un-masked data.

Traditionally, if we see the application layer takes care of masking the data and displaying it. For example: from database layer we will get a clear SSN number like 123-321-4567, but the application will mask and display it to the user as XXX-XXX-4567. With dynamic data masking from database layer only we can return the query result with masked data if user doesn’t have sufficient permission to view the actual/Unmasked data.

[ALSO READ] Row level security in Sql Server 2016

Dynamic data masking functions/rule can be defined on the table columns for which we need the masked out-put in the query result. It doesn’t change the actual value stored in the column. Masking function is applied on the query result just before returning the data, if user doesn’t have the enough permission to get the un-masked data. But user with db-owner or UNMASK permission will get the un-masked data in the query result for the masked columns. Masked out-put will be of the same data type as the column data type, in that way we can readily use this feature without really needing changes to the application layer.

[ALSO READ] New Features in Sql Server 2016

Following are the four masking functions which can be defined on table column

  1. Default
  2. Email
  3. Partial
  4. Random

To understand each of these masking function let us create a Customer Table as shown in the following image by the following script:

Example Dynamic Data Masking Table
SCRIPT:

CREATE DATABASE SqlHintsDDMDemo
GO
USE SqlHintsDDMDemo
GO
CREATE TABLE dbo.Employee
(
 EmployeeId INT IDENTITY(1,1), Name NVARCHAR(100), DOJ DATETIME,
 EmailAddress NVARCHAR(100), Phone Varchar(15),	Salary INT
)
GO
INSERT INTO dbo.Employee (Name, DOJ, EmailAddress,Phone, Salary)
Values
 ('Basavaraj', '02/20/2005', 'basav@sqlhints.com',
   '123-4567-789',900000),
 ('Kalpana', '07/01/2015', 'kalpana@sqlhints.co.in',
   '123-4567-789',100000)
GO

Let us now understand one-by-one the dynamic data masking functions. These functions can be applied to columns during table creation or can be added to the existing table columns.

1. Default()

This dynamic data masking functions behavior is based on the data type of the column on which it is applied

  • For string types it shows X for each character and max it displays 4 X’s.
  • For numeric types it shows 0
  • For dates shows 1900-01-01 00:00:00.000

Let us apply the DEFAULT dynamic data masking function on the Name and DOJ columns of the Employee table by executing the following statement

---Add DEFAULT() masking function on the Name column
ALTER Table Employee
ALTER COLUMN NAME ADD MASKED WITH (FUNCTION='DEFAULT()')

---Add DEFAULT() masking function on the Name column
ALTER Table Employee
ALTER COLUMN DOJ ADD MASKED WITH (FUNCTION='DEFAULT()')

Let us create a new user and grant select permission on the Employee table by executing the following query.

--Create user reader
CREATE USER reader WITHOUT LOGIN
--Grant select permission to the user: reader
GRANT SELECT ON Employee TO reader

Let us try to fetch the records from the Employee table by executing the query in the context of this new user

EXECUTE AS USER = 'reader'
SELECT * FROM Employee
REVERT

RESULT:
Default Dynamic Data Masking Function

From the result we can see that Name column values are replaced by XXXX and DOJ column values are replaced by 1900-01-01 00:00:00.000 in the query result.

Grant UNMASK permission to the newly created user reader to allow viewing of the un-masked data by executing the following query.

--Grant Unmask permission to the user: reader
GRANT UNMASK TO reader

Now try re-executing the previously executed query to fetch the records from the Employee table in the context of the user reader

EXECUTE AS USER = 'reader'
SELECT * FROM Employee
REVERT

RESULT:
UnMask Permission Dynamic Data Masking

From the result we can see that now the reader user can see the un-masked or actual data of the masked columns Name and DOJ

Let us remove the UNMASK permission from the user reader by executing the following statement

--Remove Unmask permission from the user: reader
REVOKE UNMASK TO reader

2. Email()

This dynamic data masking function returns first character as it is and rest is replaced by XXX@XXXX.com.

Let us apply the EMAIL dynamic data masking function on the EmailAddress Column of the Employee table by executing the following statement

---Add Email() masking function on the Name column
ALTER Table Employee
ALTER COLUMN EmailAddress 
 ADD MASKED WITH (FUNCTION='Email()')

Let us try to fetch the records from the Employee table by executing the query in the context of the user reader

EXECUTE AS USER = 'reader'
SELECT * FROM Employee
REVERT

RESULT:
Email Dynamic Data Masking Function

From the result we can see that Email column values are replaced by first character as it is followed by XXX@XXXX.com in the query result.

Let us verify whether we can query a masked column value by the actual value. In the below example trying to fetch a employee record whose EmailAddress is kalpana@sqlhints.co.in in the context of the user reader

EXECUTE AS USER = 'reader'
SELECT * FROM Employee 
WHERE EmailAddress = 'kalpana@sqlhints.co.in'
REVERT

RESULT:
Where clause on masked column

3. Partial()

This dynamic data masking function provides a mechanism where we can reveal first and last few specified number of characters with a custom padding string in the middle.

partial (prefix ,padding , suffix)

Where: prefix is the starting number of characters to be revealed and suffix is the last number of characters to be revealed from the column value. Padding is the custom padding string in the middle.

Let us apply the PARTIAL dynamic data masking function on the Phone column of the Employee table by executing the following statement

ALTER Table Employee
ALTER COLUMN Phone 
 ADD MASKED WITH (FUNCTION='Partial(2,"-ZZZ-",2)')

Let us try to fetch the records from the Employee table by executing the query in the context of the user reader

EXECUTE AS USER = 'reader'
SELECT * FROM Employee
REVERT

RESULT:
Partial Dynamic Data Masking Function

From the result we can see that Phone’s first and last 2 characters are revealed in the masked result and in the middle it is padded by the string -ZZZ-.

4. Random()

This dynamic data masking function can be applied on a column of numeric type. It returns a random value between the specified ranges.

Let us apply the RANDOM dynamic data masking function with a random value range from 1 to 9 on the Salary column of the Employee table by executing the following statement

ALTER Table Employee
ALTER COLUMN Salary ADD MASKED WITH (FUNCTION='Random(1,9)')

Let us try to fetch the records from the Employee table by executing the query in the context of the user reader

EXECUTE AS USER = 'reader'
SELECT * FROM Employee
REVERT

RESULT:
Random Dynamic Data Masking Function
Removing MASK definition from the Table Column

Below example shows how we can remove masked definition from the table column. Here in this example we are removing mask definition from the Phone column of the Employee table.

ALTER TABLE Employee 
ALTER COLUMN Phone DROP MASKED

Conclusion:

Dynamic Data masking provides a mechanism to mask or obfuscate the query result at the database level. The data stored in the data base is still in the clear or un-masked format. It is not a physical data encryption feature, an admin user or user with sufficient unmask permission can still see the complete un-masked data. This is a complementary security feature which is best-advised to use in-conjunction with other Sql Server Security features.

[ALSO READ]:

SQL SERVER 2016